Add Row
Add Element
cropper
update
Atlanta Home and Garden Insider
update
Add Element
  • Home
  • Categories
    • DIY Projects
    • Sustainable Practices
    • Design Trends
    • Landscaping
    • Lawn and Garden Care
  • Smart Home Tech
  • Interior Design Tips
  • Home Maintenance
October 10.2025
3 Minutes Read

Master the Art of Turning Off Water to Your Toilet: 3 Expert Methods

Close-up view of toilet water supply valve and hose.

The Importance of Knowing How to Shut Off the Water to Your Toilet

Understanding how to turn off the water supply to your toilet can save you from significant headaches and costs. Water damage due to leaks can escalate quickly, leading to mold growth and structural issues in your home. By being familiar with your plumbing system, you empower yourself to address potential emergencies before they become costly repairs.

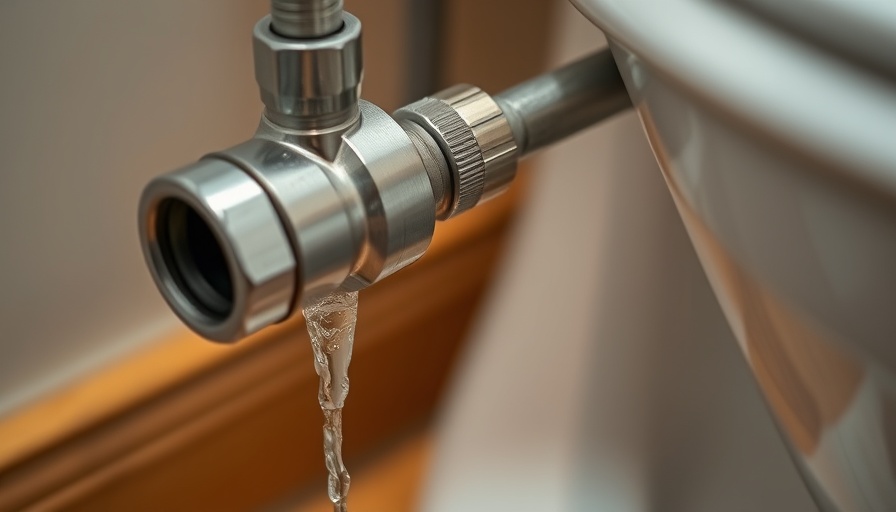
3 Simple Ways to Turn Off Water to Your Toilet

You might be surprised to learn that the process to turn off your toilet's water supply doesn't require a plumber. Here are three effective methods that can help you stop the flow and prevent flooding:

Method 1: Turn Off the Fixture's Shut-Off Valve

Your toilet likely has a dedicated shut-off valve, usually located near the base of the toilet or behind the tank. To turn off the valve, follow these steps:

  • Locate the valve at the base of your toilet. It may be a lever or a round knob.
  • For lever valves, turn it perpendicular to the pipe. For round valves, twist it clockwise until it stops.
  • If the valve is stiff, consider using a lubricant like WD-40 to loosen it up.

If successful, the toilet should stop refilling after flushing.

Method 2: Shut Off the Main Water Supply

If the fixture's valve fails, you may need to turn off the main water supply to your home. While ideal for emergencies, this method stops all water flow in the house:

  • Find the main shut-off valve, usually located in the basement, garage, or near the water heater.
  • Turn the valve clockwise to stop the water flow.

Once turned off, check faucets around the house to confirm that the water supply is fully cut off, giving you peace of mind while you address the issue.

Method 3: Use the Curbside Shut-Off Valve

This is a last resort option used during extreme plumbing emergencies. The curbside shut-off valve controls the water supply coming into your home:

  • Locate the meter box near your property line.
  • Carefully turn the valve clockwise to stop the water.
  • Note: Using this valve without assistance may be illegal in some regions, so check with your water utility company if possible.

Steps to Follow After Turning Off the Water

After the water is off, it's crucial to drain your toilet to make repairs easier. To do this:

  • Flush the toilet to expel as much water as possible from the tank and bowl.
  • If necessary, use a sponge or small pump to remove remaining water.

Actionable Insights: Preparing for Future Plumbing Issues

Ensure you're prepared for potential plumbing crises by regularly checking your shut-off valves for functionality. Familiarize yourself with their locations within your home so you can quickly respond during emergencies. Consider keeping necessary tools, such as a wrench and lubricant, nearby in case of unexpected issues.

FAQs about Toilet Water Shut-Off

As a homeowner, you may have questions regarding your plumbing:

  • How can I tell if my shut-off valve is faulty? If water flows despite turning the valve off, or if it constantly leaks, it likely needs repair or replacement.
  • What should I do if my valve is stuck? Applying a lubricant and gently attempting to turn the valve can help loosen it.
  • Is it necessary to shut off the main water supply for a leaking toilet? Only if the toilet's fixture valve is not functioning; otherwise, it should remain on.

Wrap-Up: Take Charge of Your Plumbing

Understanding how to turn off the water supply to your toilet can not only protect your home but also give you the confidence to tackle plumbing issues head-on. Embrace these methods to stay proactive and prevent water damage before it becomes a costly repair.

For more plumbing tips and DIY ideas, keep exploring home maintenance resources and consider reaching out for expert help when necessary.

Home Maintenance

3 Views

0 Comments

Write A Comment

*
*
Please complete the captcha to submit your comment.
Related Posts All Posts
03.30.2026

Create Your Own Floating Deck: No Experience Necessary!

Update Build Your Dream Floating Deck: A Beginner's Guide Creating a floating deck in your backyard can not only enhance your outdoor living space but also provide a place for relaxation, entertaining friends, or enjoying a quiet evening under the stars. With a growing trend towards DIY home improvement projects, many homeowners are now looking for simple yet effective strategies to elevate their homes without the need for professional help.In 'How to Build a Floating Deck — No Permits, No Experience Needed', the discussion dives into practical steps and insights on floating deck construction, prompting us to further explore its benefits and implementations. What is a Floating Deck? A floating deck is a versatile outdoor structure that is not anchored to the ground, allowing it to shift slightly in response to changing ground conditions. This type of deck is particularly appealing because it avoids the complications of permits and extensive construction. For homeowners aged 40 to 65 who wish to enhance their properties without excessive investment, a floating deck represents an accessible DIY solution. Essential Materials and Tools Before diving into construction, having a clear idea of the materials needed is crucial for a successful project. Typically, you will require: Pressure-treated wood for the frame and decking boards Concrete blocks or pavers for a solid foundation Decking screws and brackets to secure your structure A level and measuring tape for accurate dimensions This list highlights how straightforward building a floating deck can be; it truly is achievable even for those without construction experience. Step-by-Step Construction Process Building a floating deck can be broken down into manageable steps. Follow this general guide: Choose Your Location: Identify a flat area in your yard that receives ample sunlight. Measure and Design: Determine the size of your deck based on available space and intended use. Construct the Frame: Use pressure-treated wood to create a rectangular frame, ensuring it is square and level. Add Decking Boards: Securely fasten the decking boards to the frame, maintaining even spacing. Finishing Touches: Sand down rough edges and apply a weather-resistant sealant to prolong your deck’s lifespan. This simplified approach can help make building a floating deck a reality for any homeowner. Understanding Local Regulations One of the benefits touted in the video is that many floating decks do not require permits. However, it’s essential to check local regulations to ensure compliance. Understanding zoning laws and potential restrictions can save you from future complications. Future Insights: Sustainable Practices As we continue to trend toward sustainability in home improvement projects, consider using eco-friendly materials and practices while building your floating deck. This might include sourcing reclaimed wood or installing solar lights to brighten your deck without straining the energy grid. The Emotional Satisfaction of DIY Projects For homeowners, constructing a floating deck not only adds tangible value to their property but also fosters a sense of personal pride and accomplishment. The joy of creating something with your own hands cannot be overstated, particularly as you enjoy your new outdoor space with family and friends. Final Thoughts on Your DIY Floating Deck Project In today's fast-paced world, DIY projects have become more than just home improvements; they are opportunities for personal expression and connection with your living space. With guidance from resources like the video “How to Build a Floating Deck — No Permits, No Experience Needed,” even first-time builders can confidently embark on this rewarding journey.

03.21.2026

Why Your Home Renovation Must Include Network Protection Plans

Update Modern Renovations and Network Security: A Necessary Pair As homeowners embark on various renovation projects, from sprucing up a kitchen to adding a home office, the primary focus tends to revolve around aesthetics, permits, and timelines. However, a crucial aspect often gets overlooked: network protection. Incorporating smart technology into our homes has become a trend, but with these advancements comes the responsibility to safeguard our digital environments. The Impact of Smart Devices on Home Life Homeowners now integrate an array of connected devices into their spaces, including smart TVs, doorbells, and thermostats. While these upgrades offer undeniable benefits—streamlined convenience, enhanced comfort, and improved energy efficiency—each device connected to the home network also represents a potential vulnerability. Data from the reference articles indicates that as the number of smart devices grows, so too do the risks associated with their interconnectivity. A proactive approach to network security is essential not just for the smooth operation of these devices but also for protecting privacy. No Room for Overconfidence: Security Basics Even seemingly harmless devices can serve as backdoors for cybercriminals. For instance, a simple security camera might enable spies into your home if not properly secured. According to recent findings, unsecured devices can expose sensitive personal information. This is why it's vital to treat network protection with the same urgency as physical home renovations. Simple measures like changing default passwords, regularly updating firmware, and setting up a separate network for IoT devices significantly reduce risks by limiting hacker access. Simple Networking Plans: Taking the First Steps Understanding how to create a secure network doesn’t have to be overwhelming. Consider segmenting your network similarly to how you plan out areas in your home. Establish a main network for critical devices—laptops and personal gadgets—while designating another for smart devices. This way, if a less-secured device is compromised, the main network remains shielded. Such strategic organization can prevent day-to-day disruptions, making family life significantly smoother. Real-Life Scenarios and Common Pitfalls One common pitfall during renovations is the installation of smart devices without considering their connectivity. For instance, homeowners may set up new security cameras and assume they can connect them later, unaware that they could be broadcasting signals prematurely. By understanding and planning for these scenarios, homeowners can avoid frustrations and potential breaches. Embracing the Smart Home Advantage Safely Making life easier should always accompany modern comforts, but that ease shouldn't come at the cost of your family's security. The responsibility to secure smart devices lies not solely with manufacturers but also with users. Vigilance and awareness are key; if a product seems too convenient, there might be an underlying risk. Regularly monitoring devices and their access points can help maintain peace of mind in your high-tech haven. In conclusion, as the landscape of home renovations continues to evolve with technology, staying informed about network protection is crucial. Taking careful steps to manage both your physical infrastructure and your digital one not only enhances comfort but also reinforces security. So while you plan your next home project, remember to prioritize your network protection to ensure your home's technology works for you, not against you.

03.09.2026

Transform Your Bedroom with Stylish Duvet Covers for a Fresh Look

Update Why Duvet Covers Are Key to Bedroom Transformation A well-thought-out duvet cover serves as the heart of your bedroom's aesthetic. It can dramatically change the atmosphere and inject your personal style without needing to overhaul the entire room. By simply swapping out your duvet cover, you can refresh your entire space, creating an inviting sanctuary where you can unwind and recharge. From colors to textures, duvet covers offer the versatility to adapt spaces to match seasonal changes or evolving personal tastes. The Art of Color Selection The colors you choose for your duvet cover can enhance the overall mood of your bedroom. Light and neutral colors like white, cream, and soft gray can create a serene environment, making your bedroom feel brighter and more spacious—perfect for creating tranquility. On the other hand, bold colors like navy, forest green, or deep terracotta can add character and warmth. Layering diverse tones and patterns can give the space a modern update while maintaining a cohesive design. Fabric Matters: Comfort Meets Style The fabric of your duvet cover is as crucial as its aesthetic appeal. Cotton remains a popular choice for its breathability, durability, and easy maintenance. Linen, with its rustic charm, adds a relaxed vibe to the room and softens with each wash, further enhancing its appeal. These fabric choices directly influence comfort, sleep quality, and temperature regulation—important factors to consider for crafting a restful haven. Layering Techniques for a Designer Finish Once you've chosen the right duvet cover, layering becomes the finishing touch that transforms your bed into a work of art. Start with coordinating sheets and add decorative pillows, shams, and throws to introduce texture and depth. This layered approach not only gives a polished look but also allows for easy updates—if you grow tired of a specific throw or pillow, swapping it out is far simpler and more economical than replacing the duvet cover. Creating a Cohesive Look with Accessories A duvet cover does not exist in isolation; it sets off your bedroom decor much like an anchor in a well-crafted design. Consider how curtains, rugs, and wall art can harmonize with your chosen bedding to create a unified aesthetic. Unique accessories—think vases, candles, or framed personal photos—can also enhance your space's personality. By carefully selecting pieces that complement your duvet cover, you can create an atmosphere that feels both luxurious and inviting. Embracing Seasonal Swaps One of the joys of using duvet covers is their ability to adapt to seasons. As spring emerges, consider light linens in soft hues; during the winter months, rich textures and darker tones can create a cozier atmosphere. This practice not only allows for aesthetic freshness but also enhances comfort in your sleep environment throughout the year. Conclusion: Small Changes, Big Impact Refreshing your bedroom need not be an overwhelming endeavor. Updating your duvet cover is a simple yet effective way to add personality and comfort to your space. With countless styles and colors available, you can be assured that there’s an option that fits your unique style perfectly. So, dive into the world of duvet covers, and give your bedroom the revitalization it deserves!

Terms of Service

Privacy Policy

Core Modal Title

Sorry, no results found

You Might Find These Articles Interesting

T
Please Check Your Email
We Will Be Following Up Shortly
*
*
*