Add Row
Add Element
cropper
update
Atlanta Home Garden Insider
update
Add Element
  • Home
  • Categories
    • DIY Projects
    • Sustainable Practices
    • Design Trends
    • Landscaping
    • Lawn and Garden Care
  • Smart Home Tech
  • Interior Design Tips
  • Home Maintenance
July 22.2025
3 Minutes Read

Homeowners Reassess Teflon Tape: New Hack Reveals Surprising Results

Close-up of Teflon tape application on pipe fitting.

Unveiling the Teflon Tapes Myth: What Homeowners Need to Know

The world of DIY home improvement often brings with it novelties that promise easier and better solutions to common household problems. A recent viral video discussion led to revelations about how Teflon tape, the go-to product for many DIY enthusiasts, has typically been applied incorrectly. A significant portion of homeowners could be using Teflon tape inefficiently, potentially leading to leaks and costly repairs. This article explores the findings from the video, "I Tested This Teflon Tape Hack – Shocking Results!" and discusses the implications every homeowner should consider.

In 'I Tested This Teflon Tape Hack – Shocking Results!', the video reveals essential insights into Teflon tape application that we analyze extensively.

Rethinking Teflon Tape: The Experiment and Its Findings

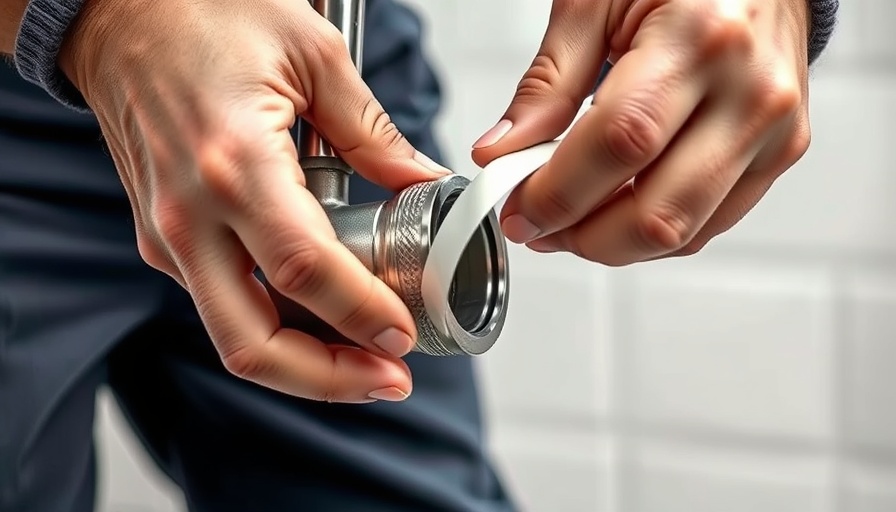
In the viral video that has captured the attention of over 40 million viewers, a method was introduced where Teflon tape is rolled into a string and then pushed into the grooves of the fitting. This technique contrasts sharply with the conventional wrapping method that most homeowners are accustomed to. The video's host tested four different sealing methods: the new Teflon hack, standard Teflon tape, premium tape known as "Blue Monster," and a combination of Teflon tape with thread sealant (often referred to as pipe dope).

The various methods were put under pressure for 10 minutes to test their efficacy. The results were eye-opening. While the DIY hack did show some promise, it also required significantly more time to apply, raising questions about its practicality for the average homeowner seeking quick fixes.

What Homeowners Should Consider: Practical Insights

For homeowners, especially those ages 40 to 50 with varying levels of DIY experience, understanding these methods can save time, stress, and potential damage to property. Key insights from the experiment illustrated that:

  • Teflon Tape with Pipe Dope: This combination emerged as the most effective method, showing no leaks after the test. It provides a strong seal while preventing friction when threading fittings together.
  • Standard Teflon Tape: While commonly used, the results indicated it had a higher likelihood of leaking, especially when not applied until it was adequately wrapped.
  • Premium Options: Products like "Blue Monster" are designed to offer improved sealing but may still require the careful application practices outlined in the video.

Embracing the Change: How to Fix Common Plumbing Issues

Plumbing problems can often occur at the most inconvenient times, causing frustration and sometimes even damage to homes. When it comes to managing these issues, the newly highlighted methods offer practical insights into saving time and resources. Homeowners experiencing leaks should consider going beyond simple Teflon tape. Instead, they could adopt a combination of tape and a thread sealant, ensuring a tight seal that stands up to pressure.

Future Trends in DIY Home Repairs: Informed Choices Lead to Better Outcomes

The overflow of DIY videos and tips available today can lead to confusion among homeowners. As the conversation around effective sealing methods continues to grow, the importance of educational resources cannot be overstated. Homeowners can avoid mishaps by turning to professional guides, quality materials, and incorporating data-driven methods into their home improvement routines.

Ultimately, by equipping themselves with the latest techniques and products, homeowners can embrace their DIY projects with confidence. Whether fixing a leak in the bathroom or making minor upgrades, every informed decision leads to better outcomes.

In conclusion, if you're ready to tackle that upcoming plumbing project or simply want to enhance your home maintenance skills, implementing these insights can make all the difference. For more guidance, be sure to explore resources that offer comprehensive DIY tips, checklists, and expert advice tailored for homeowners.

Smart Home Tech

1 Views

0 Comments

Write A Comment

*
*
Related Posts All Posts
07.22.2025

Don't Get Scammed: The Truth About Cheap Kitchen Cabinets Revealed

Update Understanding the Real Cost of Cheap Kitchen Cabinets Shopping for kitchen cabinets can be overwhelming, especially with the allure of low prices at big box retailers. However, the video Don't Get Scammed! The Shocking Truth About Cheap Kitchen Cabinets offers critical insights into the potential pitfalls of opting for the cheapest solutions. As homeowners embark on kitchen renovations, understanding the materials and construction methods used in cabinets is essential to make informed decisions.In Don't Get Scammed! The Shocking Truth About Cheap Kitchen Cabinets, the discussion dives into the stark contrasts in cabinet quality, exploring key insights that sparked deeper analysis on our end. Material Matters: The Foundation of Quality Cabinets When comparing cabinets, one of the foremost factors is the material used in their construction. In the video, Scott highlights the distinct differences between ready-to-assemble options from companies like Cabinet Giant and the builder-grade cabinets available at home improvement giants like Lowe's and Home Depot. Cabinet Giant utilizes solid plywood for their cabinet boxes—a choice that promises longevity and robustness. In contrast, builder-grade options often rely on particle board. While it may seem cost-effective at first, particle board cabinets can swell and warp over time, particularly in moisture-heavy environments like kitchens and bathrooms. Construction Quality: Assembly Insights Beyond just the materials, the construction method plays a critical role in durability. Ready-to-assemble cabinets may take time to put together, but they often feature better assembly techniques. For example, Cabinet Giant’s cabinets use sturdy brackets and screws for enhanced stability, while some less expensive options rely on staples and inferior adhesive methods. This difference results in cabinets that can withstand daily use without compromising structure. Homeowners should weigh the amount of time and effort needed to assemble high-quality cabinets against the recurring costs associated with less durable options. Hardware: The Unseen Key to Functionality Cabinets are only as good as the hardware that supports them. Scott points out the stark contrast in cabinetry hardware. Builder-grade cabinets typically employ basic slides that can wear out quickly, lacking features like soft close mechanisms. On the other hand, higher-quality brands like Cabinet Giant offer industrial-strength slides that not only improve function but enhance the user experience with dependable soft close features. This is significant for everyday kitchen use, where drawers are subjected to frequent opening and closing. Finishes That Matter: Visual Appeal and Longevity Cabinet finishes also influence both the look and durability of kitchen cabinets. Scott emphasizes the importance of selecting cabinets that feature solid wood surfaces instead of veneer or flimsy plastics. Quality finishes not only elevate the overall aesthetics but also resist chipping and wear over time. Homeowners looking to create a welcoming space must consider how the cabinets fit into their overall design vision while ensuring they can handle the rigors of family life. Value vs. Cost: Navigating Pricing Strategies In a market filled with enticing price points, understanding value is crucial. The video reveals a surprising fact: high-quality cabinets from reputable retailers like Cabinet Giant can be competitively priced, often matching or undercutting builder-grade options. With the right discounts, such as the 25% off coupon mentioned in the video, homeowners can acquire durable, stylish cabinets that stand the test of time without breaking the bank. Smart shopping means seeking out these value-driven deals while prioritizing quality over initial pricing. Making Informed Choices: Final Thoughts If you’re planning a kitchen remodel, the key takeaways from the video are clear: prioritize quality materials, construction methods, and durable hardware. While the temptation of cheap cabinets is strong, understanding the long-term repercussions of purchasing inferior products can save you time, money, and frustration in the future. The insights offered by Scott are invaluable for homeowners looking to enhance their living space with confidence. Now that you're equipped with knowledge for your kitchen project, consider exploring options that align with your design ambitions without compromising on quality. For your next DIY endeavor, remember that investing in quality cabinets is an investment in your home’s value and your family's comfort.

07.22.2025

Unlock Off-Grid Living with the Ultimate Solar Shed for Your Home

Update Discovering the Versatility of Solar Sheds In today’s world, sustainable living isn’t just a trend; it’s becoming a necessity. As climate concerns rise and energy costs fluctuate, finding alternative energy solutions is essential for homeowners. If you’re a homeowner aged 40 to 50, managing a budget between $50K and $150K, the concept of a solar shed can provide both off-grid power and organized storage. With innovative design, you can create a functional space that meets multiple needs.In 'I Built the Ultimate Solar Shed – Off-Grid Power and Storage!', the discussion dives into innovative solar solutions for homeowners, exploring key insights that sparked deeper analysis on our end. What is an Ultimate Solar Shed? A solar shed is essentially a combination of a garden shed and solar energy solution. It's not just a storage space for your tools; it's a smart home tech hub designed to harness solar power for your daily activities. Imagine having a tiny power station right in your backyard that can charge batteries, power small appliances, or even run lights in your garden. This dual-purpose structure is a fantastic investment for today’s environmentally conscious homeowner. The Benefits of Going Off-Grid Transitioning to off-grid living is not merely about self-sustainability; it can also save you a considerable amount of money in the long run. By generating your own energy, you can significantly reduce your electric bills. Additionally, solar power systems have become more efficient and affordable, making them accessible for the average homeowner. Owning a solar shed aligns well with sustainable practices, reducing your carbon footprint while fostering independence from traditional power sources. Building Your Ultimate Solar Shed: Key Elements When embarking on this DIY project, several factors should be considered to ensure you optimize space and efficiency: Solar Panels: Integrate high-efficiency solar panels to maximize energy capture, catering to your power needs based on your storage and usage requirements. Battery Storage: Invest in quality batteries that can store the energy generated, providing a reliable power source even on cloudy days. Ventilation and Insulation: Proper ventilation prevents overheating of electronic components, while insulation protects against extreme temperatures, extending the lifespan of your setup. Smart Technology: Implement smart home tech features that allow you to monitor and control energy usage efficiently. Emotional and Practical Considerations Building a solar shed isn't just about the electricity; it's also about creating a space that feels personal and functional. For homeowners, achieving energy independence through a solar shed can evoke a profound sense of accomplishment and self-sufficiency. It allows you to embrace a lifestyle free from reliance on traditional energy sources while enhancing the aesthetics of your property. It’s a blend of practicality and emotional satisfaction that holds tremendous appeal. Future Trends in Sustainable Design The trend of sustainable home design continues to grow, particularly among homeowners who value both efficiency and aesthetics. As technology evolves, expect advancements in solar panel efficiency and battery storage capabilities, making solar solutions more attainable and practical for everyday use. The future will likely see a greater integration of renewable energy features in home designs, addressing both functional needs and environmental responsibility. Getting Started: DIY Tips If you're ready to dive into this project, here are some actionable insights to help you get started: Research Local Regulations: Ensure you understand the local zoning laws and building codes of your area before starting construction. Plan Your Space: Design your solar shed by considering both your storage needs and how you plan to utilize the energy generated. Connect with Experts: Seek advice from solar energy professionals or DIY communities to gather insights and avoid common pitfalls. By engaging in this initiative, you’re not just creating a storage solution; you’re also embarking on a journey towards a sustainable lifestyle that resonates with your values.

07.22.2025

Your Complete Guide to Replacing a Hardwired Smoke Detector

Update Easily Replace Your Smoke Detector in Simple Steps Home safety is a top priority for every homeowner, and ensuring that your smoke and carbon monoxide detectors are functioning properly is crucial. From time to time, these devices may require replacement, especially when they've reached the end of their service life. Today, we delve into a practical guide on how you can effortlessly swap out a hardwired smoke or smoke/CO detector, transforming a potentially daunting task into a manageable DIY project.In Replacing a Failed Hard-Wired Smoke or Smoke/CO Detector | Fast Easy DIY, the discussion dives into effective strategies for home safety, exploring key insights that sparked deeper analysis on our end. Understanding the Importance of Smoke Detectors Every year, thousands of homes are affected by fires and carbon monoxide leaks. These silent threats can turn deadly within minutes if not detected in time. Research shows that working smoke detectors cut the risk of dying in a fire in half. Thus, understanding how to maintain and replace these critical devices is essential for every homeowner, particularly those within the 40 to 50 age demographic, where family safety is likely a top concern. Assessing Your Current Detectors Before jumping into the replacement process, it's vital to assess whether your current smoke detector is functioning or if it’s time for a change. Test your detector by pressing the test button, and look for any unusual chirping sounds, which may indicate low battery or unit failure. Remember, many smoke detectors have a service life of approximately 10 years, as indicated on the unit itself. Understanding these key points can save you time and effort before committing to a replacement. Gathering Necessary Tools and Materials To facilitate a smooth replacement process, gather all necessary tools beforehand. Required tools include a non-contact voltage tester to ensure safety while working with electrical wires, a screwdriver, and possibly a new adapter harness or lever nuts, depending on the compatibility of your new unit with the existing hardware. Having a checklist of these supplies will streamline your project and minimize interruptions. Step-by-Step Replacement Process Now that you're ready, let’s walk through the replacement process. 1. Remove The Old Detector: Use the non-contact voltage tester to confirm there’s no power running to the unit before carefully removing it from the base plate. This usually involves pulling a tab down and rotating it counter-clockwise. 2. Prepare The New Unit: When purchasing a new detector, consistency in brand can often simplify the installation. However, if the connectors do not match, consider using an adapter harness for easy installation without needing to rewire. For a more secure connection, lever nuts are highly recommended over traditional wire nuts. 3. Install The New Detector: If the new unit fits the existing plate, simply attach it and secure with screws. If it's not a direct fit, follow the adapter instructions to reconnect the wires. Following this, restore power and test the new smoke detector to ensure it is functioning correctly. Maintenance Checklist for Safety As highlighted in the installation video, having a maintenance checklist can serve as a helpful reminder for periodic checks. A simple visual cue, like placing the checklist on your refrigerator, can aid in tracking monthly and seasonal maintenance tasks for your home. Remember to press the test button on your detectors regularly as part of your routine. Final Thoughts: Empowering Homeowners Replacing a smoke or smoke/CO detector isn’t just a DIY project; it’s a step towards securing your home and family. Understanding the process and knowing when to initiate replacement can empower homeowners to take charge of their safety. If you've ever felt overwhelmed at the thought of electrical DIY tasks, remember that resources and community support are available to guide you through the process. So, if you're ready to enhance your home's safety, consider taking action today! For more video tutorials and resources on home maintenance such as this, don't forget to check out the links provided in the video description. Stay safe, and happy home-keeping!

Terms of Service

Privacy Policy

Core Modal Title

Sorry, no results found

You Might Find These Articles Interesting

T
Please Check Your Email
We Will Be Following Up Shortly
*
*
*