Add Row
Add Element
cropper
update
Atlanta Home Garden Insider
update
Add Element
  • Home
  • Categories
    • DIY Projects
    • Sustainable Practices
    • Design Trends
    • Landscaping
    • Lawn and Garden Care
  • Smart Home Tech
  • Interior Design Tips
  • Home Maintenance
July 27.2025
3 Minutes Read

Discover the 7 Dirtiest Places in Your Home You Probably Never Clean

Dirtiest places in your home, dusty vent and cleaning setup.

Why Hidden Dirt Spots Matter More Than You Think

In the pursuit of a clean home, many of us tend to focus on the visible surfaces—the kitchen counters, floors, and bathrooms. However, this often leads us to overlook some of the most insidious sources of dirt and germs lurking in our living spaces. From ceiling fans to window tracks, these hidden areas not only accumulate dust but can also harbor allergens, bacteria, and even mold. Ignoring them can negatively impact our indoor air quality and health, especially for families with children or individuals prone to allergies.

The Top 7 Overlooked Areas Needing Attention

To help you reclaim your home’s cleanliness, let’s dive deeper into the seven dirtiest places you probably never clean—plus simple solutions that can make a dramatic difference.

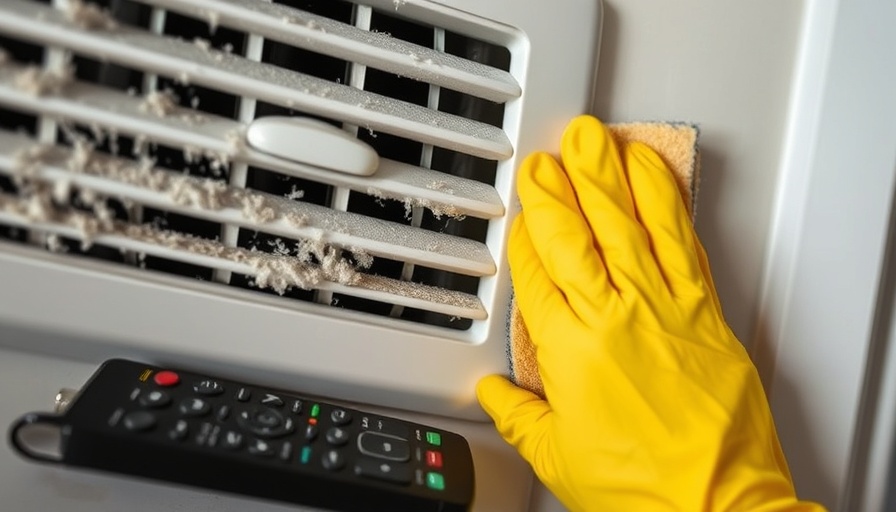
1. Ceiling Fans and Light Fixtures – Dust Collectors in Disguise

Ceiling fans and light fixtures often collect dust and allergens without us noticing. When turned on, they can disperse these particles throughout your home, triggering allergies. To clean them effectively, slide a pillowcase over the fan blades, pulling it back to catch the dust without releasing it into the air. For light fixtures, ensure you turn off the lights, then carefully remove the covers and clean them with a damp cloth.

2. Baseboards and Trim – A Neglected Frontier

These architectural pieces can become homes for dust and dirt, oftentimes covered in scuff marks and even mildew in damp areas. Vacuum them with a brush attachment to capture debris, then follow up with a microfiber cloth and all-purpose cleaner. Regularly cleaning them not only enhances the visual appeal of your rooms but also helps guard against mold.

3. Window Tracks and Sills – Where Dirt Hides

Even if your windows shine, don’t forget to examine the tracks and sills. Dust and grime can accumulate, affecting the operation of the window and indoor air quality. Using a vacuum attachment to clear debris, followed by a vinegar-water solution for stubborn spots, will refresh these often-ignored areas.

4. Under and Behind Major Appliances – The Dark Corners

Appliances like refrigerators and ovens can create hidden nests for dirt, food particles, and grime. Moving them to clean underneath can be a hassle but is essential for maintaining your kitchen hygiene. Ensure you unplug the appliances before moving them and consider using a long dusting wand to reach challenging areas.

5. Kitchen Cabinets and Cupboards – Hidden Havens

Kitchens are often lauded for cleanliness and organization, yet the insides of cabinets frequently harbor dust, crumbs, and even spills that go unnoticed. Make it a habit to clear out and wipe down your cabinets every few months to prevent buildup.

6. The Tops of Doors and Moldings – The Invisible Struggle

The top of door frames and moldings can collect dust and cobwebs that are mostly ignored. Use a microfiber cloth or a vacuum attachment to clear these areas. Regular dusting can help maintain an overall cleaner look in your home.

7. Bathroom Corners and Behind the Toilet – Stagnant Spaces

The bathroom is a hotspot for germs and mold, especially in corners and behind the toilet. Utilize a small brush or old toothbrush to scrub these pesky spots regularly. Incorporating this task into your cleaning routine could drastically improve your bathroom's hygiene.

Embrace a Cleaner Future

By addressing these hidden dirt traps, not only will you create a more aesthetically pleasing space, but you’ll also improve your family’s health. With just minor adjustments to your cleaning habits, you can transform your home into a healthier environment for everyone.

Take Action Today

Feeling inspired to tackle these hidden dirt spots? It's time to change the way you clean. Develop a friendly routine that incorporates these tasks, from ceiling fans to window sills. Remember, a cleaner environment leads to a healthier and happier home—so grab those tools and get cleaning!

Home Maintenance

0 Views

0 Comments

Write A Comment

*
*
Related Posts All Posts
07.25.2025

Navigating Power Outages with Eco-Friendly Backup Systems

Update Preparing for Power Outages: A Homeowner’s Guide As extreme weather becomes increasingly common, it’s essential for homeowners to develop reliable emergency preparedness strategies. This is especially true for those living in areas prone to storms and power outages. The good news is that you can ensure your home remains powered and comfortable during unexpected outages using innovative technology. In Scott's recent presentation on setting up an effective home backup system, he provides insightful tips on how to harness the power of renewable energy without relying on gas generators.In How I Keep My House Running Through Any Storm (No Gas Needed), Scott discusses assembling a home backup system, prompting us to explore the significance of preparedness and sustainable energy solutions for homeowners. Understanding Your Energy Needs One of the first steps in creating a dependable backup system is assessing your energy requirements. Scott emphasizes the importance of identifying critical appliances that you need to keep powered during an outage. Whether it’s your refrigerator, furnace, or Wi-Fi router, knowing your power demands is crucial. To assist with this, he has developed a worksheet that helps homeowners determine continuous power needs, surge power requirements, and overall energy consumption. This valuable resource should not be overlooked, as it sets the foundation for customizing your backup system efficiently. Solar Power as a Lifeline In his setup, Scott showcases the EcoFlow Delta Pro Ultra, providing an excellent example of how solar power can sustain your home through prolonged outages. By integrating solar panels into your system, you can continuously recharge power stations and maintain functionality even when the grid is down. With the sun's energy, the Delta Pro can yield significant solar input, preparing you for multiple days without grid power. This dual strategy of using portable power stations alongside solar panels not only provides resilience but also promotes sustainable practices in energy usage. Installation: DIY or Professional? Setting up a home backup system might seem daunting, but Scott encourages a do-it-yourself approach, making it approachable for homeowners with basic skills. However, professionals should install more complex elements like generator inlets or interlock kits. These modifications ensure safety, particularly when preventing back feed into the grid during power outages. As you navigate this process, consider whether to consult with an electrician to handle advanced installations while you manage simpler tasks, like setting up solar panels or integrating portable power stations. Tools and Resources for Success To facilitate your setup, Scott introduces essential tools such as MC4 connectors and PV wiring. These components, while standard in solar setups, are vital in ensuring a reliable connection and safe operation of your home backup system. Equipping yourself with the right tools and knowledge will empower you to confidently manage your home’s energy requirements. Adapting to Future Needs Another critical aspect Scott discusses is future-proofing your backup power system. By choosing systems with expandable capabilities and the potential for more solar panels, homeowners can ensure their systems meet evolving energy demands. Investing in quality equipment today not only prepares you for current risks but also positions you for future needs — a crucial consideration for responsible homeowners. Conclusion: Taking Charge of Home Energy Management Scott’s insights into creating a reliable backup system offer homeowners an actionable framework to follow. As storms and power outages become more common, investing in a sustainable home power solution is no longer just an option; it’s a necessity. You can enhance your preparedness and peace of mind by gaining the knowledge and tools needed to manage your home energy. If you’re ready to take the next step, consider exploring Scott’s worksheet for sizing your needs and dive into the world of solar power integration. Taking proactive steps today can help secure your home against whatever challenges may come tomorrow.

07.26.2025

Transform Your Space: A Comprehensive Guide to Cleaning Your Shark Vacuum

Update Why Regular Maintenance is Key for Your Shark Vacuum If you've noticed that your Shark vacuum's suction power isn’t what it used to be or there's an unpleasant dirty odor, it might be time to assess your cleaning habits. Regular maintenance not only keeps your vacuum running smoothly, but it also ensures your home stays fresh and cleaner for longer. Just like a companion, your vacuum requires love and care—let’s dive into how you can achieve that! How Often Should You Clean Your Vacuum? Understanding how often to clean your Shark vacuum is crucial for its longevity. Generally, it’s a good idea to empty the dustbin after every use. Regular checks also help maintain suction; cleaning when the bin is half-full is ideal. Depending on your vacuum model, monthly cleaning of the roller brushes and hoses should be part of your routine, ensuring your vacuum operates at peak performance. A Step-By-Step Cleaning Guide Cleaning your Shark vacuum doesn’t require expert knowledge—just a few tools and a bit of time! Here’s a straightforward method to get your vacuum back into top shape: Step 1: Safety First Before diving into cleaning, unplug the vacuum to avoid any accidents. For thoroughness, take your vacuum outside to shake out the dust. Step 2: Inspect and Clean the Roller Brush The roller brush is often a breeding ground for dust and pet hair. Detach the brush from the vacuum head (most models have a push-button feature). Use a pair of scissors to gently remove tangles and debris, followed by a soft brush for stubborn particles. Once cleaned, let it dry completely for at least 24 hours before reattaching. Step 3: Clean the Dust Collection Cup Your vacuum’s dust collection cup or bin is just as important as the brush. Remove it and clean it with warm, soapy water. Ensure it’s thoroughly dried before replacing it to avoid mold and odors—a little extra care goes a long way! Step 4: Check and Clean Filters Many Shark vacuum filters are designed to be washable. Check your model and rinse them gently under cold water until the water runs clear. Ensure they’re completely dried before reinserting them into your vacuum. Step 5: Maintain the Hoses Lastly, inspect the vacuum’s hoses for any clogs or dirt build-up. You can use a soft brush or a damp cloth to wipe them down, ensuring optimal airflow. Regular maintenance of these attachments ensures your vacuum pulls in every speck of dust. Why This Matters for Homeowners For homeowners, understanding and implementing these cleaning techniques not only enhances the efficiency of the Shark vacuum but also contributes to a healthier living environment. A clean vacuum means a cleaner home, reducing allergies and keeping dust at bay. Regular vacuum maintenance is an integral part of home care that shouldn't be overlooked. Future Insights for Household Appliances Looking ahead, properly maintaining household appliances like vacuums is becoming increasingly important as smart technology and energy-efficient models gain popularity. Investing time in maintenance can enhance appliance longevity, improve performance, and ultimately save money in the long run. It’s a small commitment that pays off with larger rewards. Take Action Now! Cleaning your Shark vacuum is more than just a chore; it’s a step toward creating a healthier home environment. Gather your supplies and embark on this cleaning journey. Not only will your vacuum thank you, but your family will appreciate the cleaner air quality and overall environment. Ready to transform your cleaning routine?

07.25.2025

Transform Your Bathroom with a Stylish and Practical Barn Door

Update Why Barn Doors Are Gaining Popularity in BathroomsHome renovations often spark a flurry of decisions about aesthetics, functionality, and space optimization. Among the stunning options available for bathroom doors, barn doors are rapidly becoming a trend worth considering. Their unique design not only breaks away from the standard door aesthetic but also transforms the space into something more rustic and appealing. This article dives into why a barn door may be the perfect addition to your bathroom renovation.The Space-Saving Advantages of Barn DoorsOne of the standout features of barn doors is their space-saving capability. Traditional doors require ample room to swing open, which can be a significant limitation, especially in compact bathrooms. Barn doors eliminate this issue by sliding along a track, making them a practical solution for maximizing small spaces. This sliding mechanism means you can fit more features into your bathroom, like larger countertops or additional storage, which can enhance both practicality and style. Imagine being able to configure your bathroom layout perfectly without being constrained by door clearance!Simple Installation: A DIY-Friendly OptionIf you’re someone who enjoys DIY projects, barn doors present an exciting opportunity to upgrade your bathroom without the need for professional help—and the associated costs. With a few tools and basic instructions, you can install a barn door yourself. This hands-on approach can provide a sense of accomplishment while also giving you complete control over your design. Online resources and videos can guide you through the installation process, making it an accessible project for many homeowners.Versatility Beyond the BathroomWhile barn doors are often associated with bathrooms, their versatility allows them to enhance other areas of your home. They are suitable for master suites, guest bathrooms, kitchens, and living rooms, providing a cohesive look throughout your home. This adaptability means you can create a beautiful flow from room to room, incorporating the charm of barn doors wherever you desire. Their ability to match various design styles—be it modern, rustic, or eclectic—makes them a favorable choice for any homeowner.Increasing Value with Aesthetic AppealInvesting in a barn door can increase your home's market value. In today's home-buying landscape, uniqueness and charm can make a home more desirable. A stylishly installed barn door can catch the eye of potential buyers, giving you an edge in a competitive market. Not only do they elevate your home's aesthetic, but they can also distinguish your property from others in your neighborhood, making it a worthwhile investment.Final Touches: Customization Options for Your Barn DoorWhen choosing a barn door for your bathroom, the vast array of styles, materials, and colors available allows for personalized choices that suit your preferences. Whether you opt for a sleek modern finish or a rustic wood grain, the customization possibilities are endless. You can even match the door with the existing decor of your bathroom or other parts of your home. This thoughtful integration not only enhances physical space but also brings emotional comfort—a crucial aspect of home design.Actionable Steps for Barn Door InstallationReady to take the plunge? Here’s a brief overview of steps you might take to install your barn door:Measure your doorway accurately, including height and width.Choose your barn door style and material based on your bathroom's design.Purchase your hardware kit, which typically includes the sliding track, rollers, and necessary screws.Install the track and hang your door, ensuring everything moves smoothly.Add any desired finishing touches, like handles or stained finishes.By following these steps, you not only enhance your bathroom but also engage deeply in a rewarding DIY venture, creating a unique space that reflects your style.Conclusion: Embrace the Barn Door TrendIn conclusion, incorporating a barn door into your bathroom design is not just a current trend; it offers practical solutions and aesthetic enhancements. From its space-saving qualities to ease of installation, and the versatility it introduces, a barn door can be a wonderful addition to any home. If you’re considering a bathroom makeover, why not explore the possibilities of a barn door? It might just be the game-changer you’ve been looking for.

Terms of Service

Privacy Policy

Core Modal Title

Sorry, no results found

You Might Find These Articles Interesting

T
Please Check Your Email
We Will Be Following Up Shortly
*
*
*